
Old Version of docs for older IDE http://learn.friedcircuits.us/tinyisp-tuner-old/

-
Current
Version 1.1 -

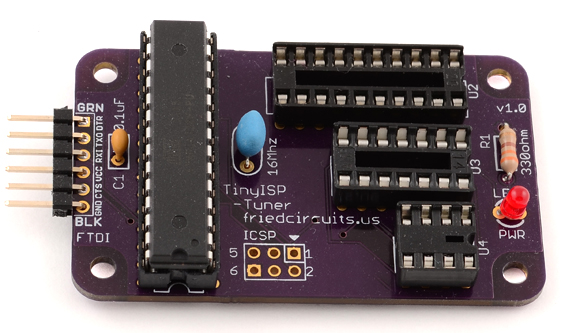
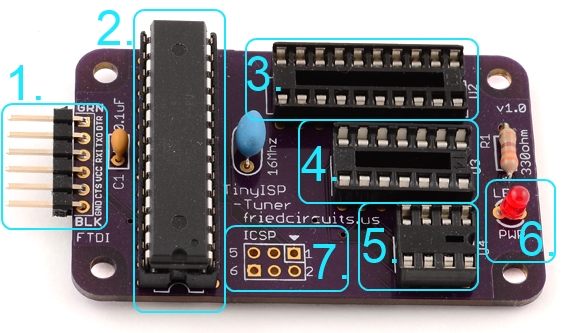
- FTDI Connection
- ATmega328p – Runs TinyISP Sketch configured with Tuning enabled. (Pre-programmed)
- 20pin Socket for ATtiny23134313
- 14pin Socket for ATtiny844424
- 8pin Socket for ATtiny854525
- Status LED controlled by ATmega328p and TinyISP Sketch on pin 9
- ATmega328p ICSP Program header
Assembly
Add some content to your accordion item here.
Important Notes
- Never have more than 1 ATtiny in one of the sockets.
- Always check the orientation before powering up.
- Always power down before insertingremoving an IC.
- If you don’t want the hassle of removing the IC you can slightly push it in the socket instead of all the way.
- You can use this just to program ATtinys without tuning them or if you have already tuned them.
Downloads
- All we need is the Arduino IDE 1.6.4+
Arduino IDE Download - Now with Arduino IDE 1.6.4+ setup for the Attiny’s are much easier.
Setup Tiny Core
-
Add board URL to Arduino Board Manager
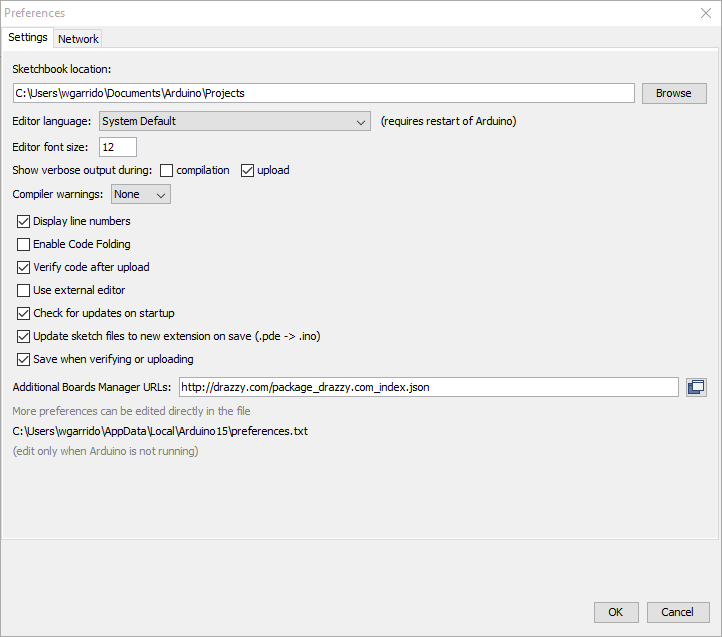
- Go to File | Preferances
- Enter the following URL
- http://drazzy.com/package_drazzy.com_index.json
- Go to Tools | Board | Boards Manager
- Due to a bug open board manager twice.

-
- In the Board Manager scroll to the bottom
- There should be two entries ATtiny Core / ATtiny Modern
- Click on the ATtiny Core and click install
- Now you can select the ATtiny from the boards list
- Then select your options and the version of the series you want


Programming Basic Sketch
Be careful with setting the external oscillator since the TinyISP-Tuner does not have a clock source. Once you burn the “bootloader” you will not be able to program it again unless you add a clock source.
- Now lets test programming the ATtiny.
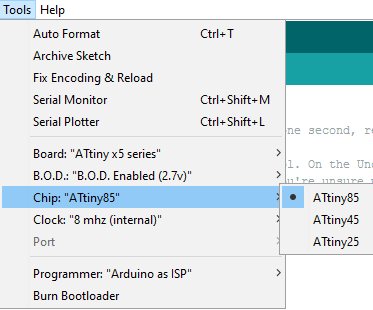
- Select the chip you are using from
Tools | Board | ATtiny (Series) - Select the B.O.D option you want.
Tools | B.O.D - Select the chip in that series
Tools | Chip - Select the clock
Tools | Clock - Programmer should be Arduino as ISP from
Tools | Programmer - Then test with the blink sketch from
File | Examples | Basics | Blink - Lightly insert the ATtiny to the apporate socket with the notch/dimple facing the LED.
- Load fuse settings by running
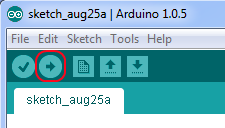
Tools | Burn bootloader. This isn’t actually burn a bootloader. - Finally load the sketch using the right arrow button or
Sketch | Upload
- Select the chip you are using from


ATtiny Tuning
Tuning improves serial communications when running on the internal oscillator. If you plan on using a resonator/crystal then you can skip tuning.
-
Download the TinyTuner Library from
https://github.com/Coding-Badly/TinyTuner2
Use the “Download Zip” button the right. - IDE Projects/Library
Using Serial
- Placeholder
- Placeholder