
Info: USB Tester OLED Backpack
Purchase: Tindie
The USB Tester OLED backpack is an add-on for the USB Tester for displaying and data logging the voltage and current for any USB device. This allows you to easily monitor USB devices without having to connect a Digital Multi-Meter. This guide will cover the how to use the Java desktop application for data logging and setting the set point LED.
The Java application can be downloaded from Github.
Since Java isn’t included in the download I have compiled it for different Java versions and for 64bit OSX which needed a 64bit version of the serial library.
Java GitHub Versions
If you are on Windows or Linux then download the folder that is your Java version. For OSX it would be the Java_1.6×64-OSX if you have a newer Mac with 64bit which would be Snow Leopard or newer otherwise it will be the same as Windows\Linux.
You can type the following at your command prompt to find your Java version.
Java -version
Once downloaded you can run the Jar file. Depending on your system config you can double click the file or run it from the command prompt.
java -jar USBTester.jar
You maybe need the rxtxSerial.dll, you can find the latest here: http://rxtx.qbang.org/wiki/index.php/Download
The DLL is also in the Github.
You should see the following:
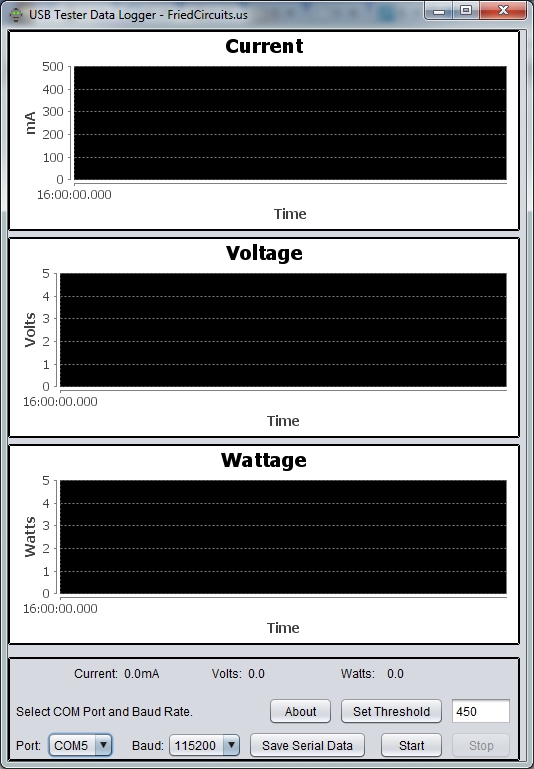
USB Tester OLED Backpack Java App First Load
If no COM ports show up make sure the OLED Backpack is plugged in before you run the app. If this is the first time you have used a microcontroller with the Atmega32u4 (like the Leonardo) you will need to download the Arduino IDE which has the drivers for Windows. http://arduino.cc/en/main/software
The app defaults to the first COM port and baud rate 115200. You should leave the baud as is unless you have changed it in the microcontroller code. Now you can click start and the graph should start to update once per second.
The “Set Threshold” button will set at what milliamps the blue LED will turn on. The default is 450 since that is 50mA less than the maximum for USB which is 500mA.
Once you have recorded your data you can save it to a text file by clicking the “Save Serial Data” button. Then you can open it in another application like Excel. The text file contains the raw values.